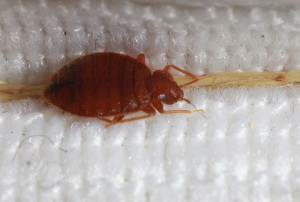
One of the most common locations to find bed bugs is on the mattress. Look along the welting around the top and bottom mattress edges.
A couple of weeks ago I was talking with a nice lady on the phone about bed bugs. As if she couldn’t believe anyone else could quite empathize with her situation, she suddenly asked me, “Have you ever had to deal with bed bugs yourself?” Thanks to a recent experience with one of my daughters, I could confidently answer “Why yes, I have!”
Last month answering a late night call from my youngest daughter I hear, “Dad, I think I’ve got bed bugs!” The next day at her apartment we discovered that she had more than just a few bed bugs. She had a full blown infestation. Together we found 200 to 300 bed bugs happily tucked away in the corners of the fitted sheets, dust ruffle and box spring cover of her bed.
Of course my daughter’s first concern was where to sleep. As with all of us, ignorance is bliss. The night before her discovery it was OK to sleep in her infested bed. But now that she knew her bed was crawling with unwanted “vampire bugs”, it just wasn’t the place for a restful sleep. I can’t say I blamed her.
In general it’s not a good idea to abandon one’s bed as a solution to bed bugs. The problem is that once you start sleeping on the couch, or in an adjacent room, it’s just a matter of time before the bed bugs figure out where supper has moved. Then you end up with bed bugs all over the house. But for at least one night I counseled her to sleep on the couch and I would be over the next day to help.

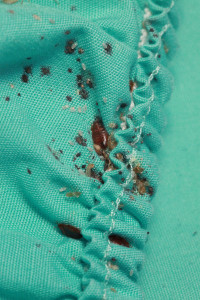
When inspecting the bedding for bed bugs look along seams and in creases. A vacuum cleaner is excellent for removing adult and immature bed bugs, though not so good for removing eggs. Double click on this picture and see how many of the almost two dozen transluscent pearl-colored, oval-shaped eggs you can find. Note the black fecal spots, shed skins, and three adult bed bugs in this aggregation spot.
Because I wanted her to get back in her own bed as quickly as possible, we opted to make her bed safe while waiting for the professionals to arrive. She just needed a little first aid for bed bugs–something to protect her until the cavalry showed up.
Conducting Bed Bug First Aid
While many bed bug control professionals promise next-day service for bed bugs, sometimes it can take several days to get an appointment scheduled. So how can you create a safe sleeping oasis in an apartment with bed bugs? It’s not as hard as you might think.
To do bed bug first aid you’ll need a vacuum cleaner, a set of mattress/box spring encasements, and either Climbup® Insect Interceptors, or some other barrier to keep bed bugs from climbing the bed.
Step 1: Vacuum. The vacuum cleaner is useful for removing live bed bugs. Use the attachment hose to go along seams of your bedding, dust ruffle, mattress and box spring. Pick up any bed bugs you see, and be sure to vacuum the bed frame as well. Finish by vacuuming the carpet or floor under the bed. Discard the vacuum bag outdoors in a garbage can or dumpster, and place all sheets, blankets, pillows and pillow cases in large plastic bags. Generally clear plastic bags are recommended, for reasons I can explain another time.
Step 2: Encase. The next thing is to encase your mattress and (if you have one) boxspring in a good quality bed bug-proof mattress encasement. The purpose of an encasement is to trap any bed bugs or eggs you did not remove with your vacuum cleaner. Good encasements seal tightly and are made of fabric that bed bugs cannot bite through. Check the zipper on encasements to make sure there are no visible gaps between teeth and that the zipper handle hooks, or can otherwise be secured so that it will not open over time.
Chances are that you can find bed bug-proof encasements at a local department or mattress store. If you have the time, these can also be purchased online. Brands include Luna, CleanRest, Sleep Guard, Mattress Safe, and Protect-A-Bed. Amazon.com sells a variety of encasements and provides customer reviews. A good set of encasements can run close to $100 for mattress and boxspring, and will be your biggest investment. Be sure you know your bedding size before shopping. Some pest control companies, and pest control equipment suppliers, will sell encasements to the public also.

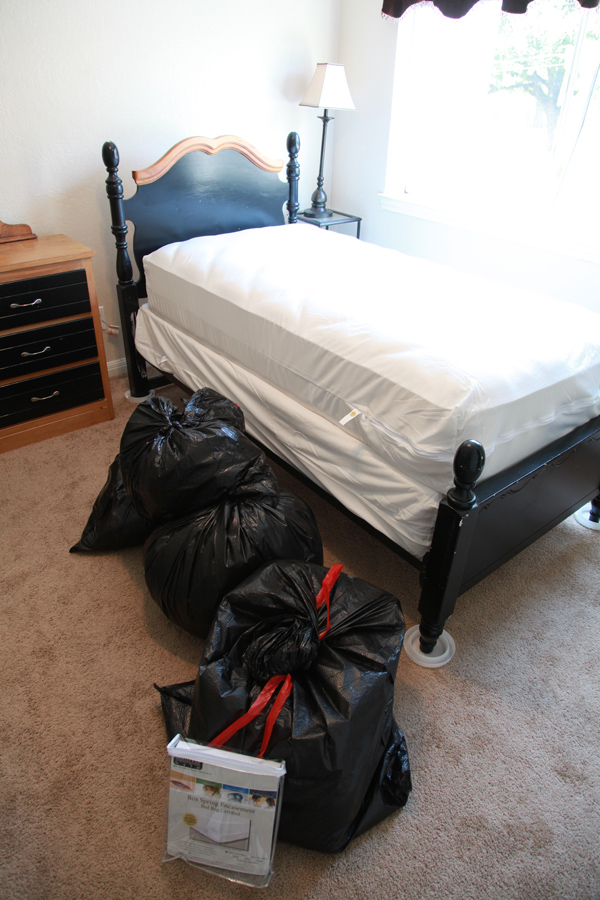
My daughter’s bed after treatment, encasement installation and installation of ClimbUps®. This prep work gave my daughter a relatively safe place to sleep while the bed bugs off the bed were being treated.
Step 3: Treat or discard bed. Once the bedding is bagged and mattresses encased, you need to treat the bed frame. Platforms for water beds, or any bed made from rough wood, chipboard or plywood can be especially difficult to treat. If you have this kind of bed, you may want to consider moving your mattress and box spring to a simple metal bed frame or other four-legged bed. Platform, and other rough wood beds, should be moved aside for later treatment by a professional, or carefully moved out of the house until the bed bug problem is eliminated. The important thing at this stage is to get your mattress off the floor and onto four wheels or posts.
Treating the bed frame is the trickiest part of this job. On my daughter’s bed I used an aerosol treatment called Zenprox®, but many products will work too. Diatomaceous earth is a low-toxicity dust that can be applied to cracks and crevices of the bed and frame. Be sure to dust the smallest holes liberally with the dust. You can vacuum the excess later. Use care with alcohol-based sprays, like Sterifab, to avoid over-application (rubbing alcohol is highly flammable, so don’t smoke or allow flames near wet surfaces). Many aerosol bed bug sprays are available over the counter and will provide adequate control if bed bugs in the cracks are directly wetted with the spray. Don’t waste your money on “bug bombs”. They don’t penetrate deeply enough into cracks to kill bed bugs.
Step 4. Keep bed bugs off the bed. One of the best tools to isolate your bed from any bed bugs that might be in the bedroom are bed bug interceptor cups. In my daughter’s apartment I used ClimbUp® interceptors under each of the feet of her bed. The ClimbUp® is a simple plastic dish with smooth sides and a light dusting of talc that together create an un-climbable pit inside the dish. The outside of the dish is covered with a rough surface that bed bugs readily ascend, but once in the cup they cannot escape. This provides a way to not only protect the bed from bed bugs, but also provides a way to monitor the success of a bed bug treatment.
You can also make your own temporary interceptor with a dish (or even pet food bowl) dusted with a light dusting of talc. Soapy water can make a good barrier, but will evaporate over a few days and is probably not very good for wooden bed posts or even metal posts over the long term. I’ve seen people use glue boards or fly paper under the feet of the bed, but this seems too messy to me. Removing glue from the bed post, or dropping a favorite sock into a sticky mess is not very appealing.
Whatever method you use it’s critical to keep the bed from touching the walls or furniture, and to keep bedding from touching the floor. If you can do this, you should be able to sleep bed bug free until you can have a more thorough treatment done.
To make a long story short, daughter returned to sleep in her own bed that night, and after a month reports no more bed bugs. There have been a few strays, and of course the pest control company that arrived the next day undoubtedly deserves much credit for keeping the infestation from spreading; but I believe the steps we took went a long way toward solving her bed bug woes.
Over the years my children have mostly just tolerated my entomological interests. After this incident, though, I think at least one has decided that having an entomologist dad can be kind of handy.